Saving chilli or sweet pepper seeds is not rocket science. The main objective is to remove the seeds from the peppers and then place them somewhere to dry. However, rather than just de-seeding your chosen varieties at the end of the season once the plants have finished flowering and fruiting there are a few things you should be aware of beforehand, and on this page we'll take a look at what those things are.
You can save seeds from any ripe chillies or
sweet peppers, but unless you make the effort to isolate the plants or isolate some of the flowers on said plants then there are no guarantees that the seeds you do save from your chosen
pepper varieties will be true to type. If you save seeds from peppers that developed from flowers which weren't isolated then it's what's known as open-pollinated (OP), meaning there's a possibility that the flowers could have cross-pollinated with the flowers of other varieties growing nearby, which will result in hybrid seeds. This is the reason why most chilli growers go to the trouble of isolating flowers or entire plants.
Unlike some plant species where the female flowers require pollen from the male flowers in order to produce fruit, Capsicums are mainly self-pollinating, meaning that their flowers contain both male and female parts (hermaphrodites). The anthers and filaments are the male parts of the flower, and as a whole they are known as stamens. The stigma, style and ovary are the female parts of the flower, and as a whole they are known as the pistil. The female part resides in the centre of the flower and the male parts surround it. When pollen from the anthers (male) touches the stigma (female) it passes through the pistil and then reaches the ovary and fertilises the ovules (eggs) inside. Mature ovules are seeds and the mature ovary is the fruit which surrounds them.
 |
Anatomy of a Chilli Pepper Flower
|
 |
Anatomy of a Chilli Pepper
|
If the pollen that touches the stigma comes from the same flower or from another flower on the same plant or even from a flower on a different plant of the same variety, then the seeds that develop inside the fruit will be true to type. However, if pollen from another variety were to touch the stigma then it would result in hybrid seeds due to cross-pollination. If one were to grow plants from said hybrid seeds then the resulting plants would be first generation (F1) hybrids and would likely show traits of both parents. If one were to save seeds from said F1 hybrid and use those to grow more plants then the resulting plants would be second generation (F2) hybrids, and so on and so forth. In the first generation things aren't too unusual, but in the second and third generations they start to get more interesting. It takes approximately seven generations to create a new semi-stable hybrid. Some varieties of chilli and sweet pepper seeds are already sold as F1 hybrids, and if one were to grow plants from seeds that were saved from an
F1 hybrid then the resulting plants would be unstable.
 |
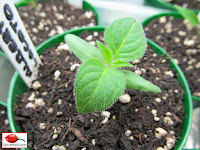
Chilli Pepper Seedlings - 16th February 2014
|
Although there are no guarantees that growing chilli or sweet pepper plants from open-pollinated seeds will result in true to type plants, you can still give it a try. It may not be the case that every single flower on every plant was cross-pollinated, but of course, it is possible. However, you won't know until you give it a try. Sometimes, it can be good fun growing pepper plants from open-pollinated seeds because you never know what you might get. However, most chilli growers prefer to isolate flowers or entire plants so that they know their seeds are going to be true to type, meaning that plants grown from said seeds will always grow true. If you're only growing one pepper variety then cross-pollination is of much less concern. However, if one of your neighbours or someone else living nearby is also growing peppers then there's still a chance of cross-pollination occurring due to pollinating insects, such as bees.
Growing chilli or sweet pepper plants indoors greatly reduces the possibility of cross-pollination due to the lack of wind and pollinating insects. However, that's not to suggest that wind or pollinating insects still can't enter through an open or partially opened window and cross-pollinate some of the flowers on your plants. It can happen if you're not careful, but an indoor environment is much more controlled, and it is therefore much easier to produce true to type seeds when growing pepper plants indoors than it is when growing them outdoors in a greenhouse or in the garden, where pollinating insects can go about their business as they see fit.
Of the five domesticated
Capsicum species —
C. annuum,
C. baccatum,
C. chinense,
C. frutescens and
C. pubescens — the only one that won't cross-pollinate with any of the other four is
C. pubescens. However,
C. pubescens will obviously cross-pollinate with other members of the same species and with members of the
C. eximium and
C. cardenasii species, both of which are wild species native to the Andean region in South America. Some sources claim that
C. pubescens can be pollinated by
C. baccatum and
C. chinense and that fruits and seeds will set, but the F1 seeds will be inviable. For this reason, even if you're only growing one
C. pubescens variety but plan on saving seeds from it, it may still be a good idea to isolate a few flowers on the plant just to make sure that the seeds you do save are viable. Of the four remaining domesticated species, some will cross-pollinate with each other and produce viable seeds, while others will only produce partially fertile seeds.
Methods for Isolating Chilli Pepper Flowers
Isolating chilli or sweet pepper flowers can be done in several ways. When isolating individual flowers some people use teabags, small organza bags, small grip seal bags or PVA glue. You can use whatever you think will work. Basically, when using bags the idea is to place the bag over a flower bud so that nothing can get inside the bag and cross-pollinate the flower once it has opened, be it pollinating insects or pollen from another variety growing nearby. When using teabags you just snip off the corner, empty out the contents and then seal the hole back up using cellotape or glue. You then make a small hole at the other end of the teabag and then place it carefully over a flower bud. When the flower bud opens up inside the bag the petals will help to prevent the bag from falling off. I find it easier to use round teabags than square teabags. Using grip seal bags and organza bags works in the same way. You just place the flower bud through the open end of the bag and then carefully close the grip seal or tighten the drawstring around the pedicel (stalk), leaving just enough space to ensure that you don't accidentally crush the delicate pedicel.
 |
| Isolating Chilli Pepper Flowers - Organza Bag Method - Step 1 |
 |
| Isolating Chilli Pepper Flowers - Organza Bag Method - Step 2 |
 |
| Isolating Chilli Pepper Flowers - Organza Bag Method - Step 3 |
 |
Isolating Chilli Pepper Flowers - Organza Bag Method - Step 4
|
 |
Trinidad Moruga Scorpion
|
Tip: When using organza bags to isolate chilli pepper flowers give the bags a light misting every evening with plain water and it will help with fruit set.
Another method that some growers use to isolate individual chilli flowers is the PVA glue method. This method involves coating flower buds with PVA glue so that the flowers remain closed. You can either use clear PVA glue or white PVA glue, both types work just as well. Once glued shut, the flower will still go through the same processes, except the petals remain closed. Contrary to what you may be thinking, this method actually works very well and is the method I now use to isolate flowers on all of my outdoor chilli plants. It is perhaps the best method to use on outdoor plants because if the flowers don't pollinate successfully at least you're not left with teabags, organza bags or grip seal bags scattered around your garden.
However, the downside with the PVA glue method is that it needs to be done during dry weather. If it rains after applying the glue then sometimes the glue may be washed off and some of the flowers may open. In such instances, you'll need to check to see which flowers have remained closed and which ones have opened. The ones that have remained closed can be left on the plants but you'll need to remove the ones that have opened before gluing any more.
First, find some flower buds on the plant you wish to collect isolated seed from. You need to pick flower buds that are just about to open. If you're doing it on an outdoor plant you'll need to pick a dry day. Mark out the flower buds by gently tying pieces of brightly coloured string or knitting wool around the pedicel. Be careful not to tighten it too much, just enough so that it won't come undone. It's always best to isolate several flowers at one time because not all of them will pollinate successfully.
 |
| Isolating Chilli Pepper Flowers - PVA Glue Method - Step 1 |
Pour some of the PVA glue into a small pot, and using a small paintbrush or cotton bud coat each of the flower buds with the glue, making sure that they are coated on all sides and at the bottom. You need to be quite generous with the glue. Don't just dab a tiny amount on because it won't work.
 |
Isolating Chilli Pepper Flowers - PVA Glue Method - Step 2
|
After a few days, you'll notice that the flower buds have grown larger. This is the stage where the flowers would normally have opened had you not have glued them shut. After several more days, you'll notice that the glued flower buds have dropped off or are hanging off. It should be noted that this doesn't necessarily mean the flowers have pollinated successfully. You may notice a few days later that some of them have dropped off. It happens sometimes. This is the reason why I recommend gluing several flower buds at the same time. I typically have success with about two or three flowers out of six.
 |
| Isolating Chilli Pepper Flowers - PVA Glue Method - Step 3 |
If the flower was pollinated successfully you'll know soon enough because it won't drop off and will start to form into a fruit, as can be seen in this next photo.
 |
| Isolating Chilli Pepper Flowers - PVA Glue Method - Step 4 |
It's important to mention here that you should only use PVA glue. Using anything stronger, such as super glue or UHU glue, will result in the flower buds turning brown, shrivelling up and dropping off, as can be seen in these next two photos.
 |
| Isolating Chilli Pepper Flowers - Flower Damage from Using the Wrong Glue |
 |
| Isolating Chilli Pepper Flowers - Flower Damage from Using the Wrong Glue |
With any of the bag methods, if the flower inside the bag is successfully pollinated and you see a fruit starting to develop then you'll know that the seeds inside that particular fruit are going to be true to type. Once you know it has been successful you will then need to mark out the individual fruit and carefully remove the bag. You can mark out individual fruit by gently tying a piece of string or wool around the pedicel. It's better to use something brightly coloured so that you can easily identify it later on. I find that brightly coloured knitting wool works very well. Isolating individual flowers can be a fiddly process and it doesn't always work. You may need to make several attempts before you finally get one that pollinates successfully. Personally, I've had much more success using organza bags and PVA glue than I have using teabags or grip seal bags.
If the peppers containing the true to type seed are growing on an outdoor plant or a plant in a greenhouse you can cover each of them with an organza bag once they've grown a little larger to help protect them from potential pest damage. Just place the bag over the fruit and tighten the drawstring so that nothing can get inside. Slugs, snails and earwigs will happily munch away at ripe or unripe peppers. Earwigs can be a problem at any time of year, but they tend to become a bigger problem in autumn. They are also more of a problem on plants growing in greenhouses than they are on plants growing outdoors. It can be very annoying when you've gone to the trouble of isolating flowers for true to type seed and then later in the season you notice that something has eaten away at one or more of the peppers containing the true to type seed. Earwigs have always been my biggest nemesis!
 |
Isolated Chilli Pepper
|
It's much easier and far less time consuming to isolate an entire branch or a portion of one than it is to isolate individual flowers. For this, you can use large fine mesh bags, such as nylon straining bags, or horticultural fleece. When selecting mesh bags for this purpose make sure they're quite large so that you can fit a good portion of the branch inside the bag. All you do is place the bag over the branch and then fasten it shut at the bottom with a piece of string to make sure that no insects can get inside and pollinate the flowers. Using horticultural fleece works in the same way. All you do is loosely wrap it over the branch and then fasten it shut at the bottom using a piece of string. When using horticultural fleece you'll probably need a larger piece than you first realise, so make sure you measure it properly before cutting it. If you're able to source large enough bags you can even isolate entire plants this way.
 |
Isolated Branches on Chilli Pepper Plants - 20th July 2014
|
Before isolating an entire branch, you'll first need to remove any opened flowers on said branch because you've no way of knowing if the opened flowers have already been cross-pollinated. You only want flower buds remaining on the branch before covering it. The buds will eventually open up inside the bag, and if some of the flowers are successfully pollinated and you see small fruits starting to develop then you will know that the seeds inside those particular fruits are going to be true to type. As with isolating individual flowers, once you know that some of the flowers have been successfully pollinated then you will need mark out the individual fruits using the method described above.
Alternatively, you can isolate an entire plant by growing it indoors away from the rest or by growing it in an isolation cage or by covering it with horticultural fleece. As with isolating an entire branch, if you choose to isolate an entire plant that already has opened flowers on it then you'll need to remove all the opened flowers beforehand. Once the isolated plant has set a sufficient amount of fruit and you've marked out said fruit then you can place it back in the greenhouse with the rest of your plants. Whether you choose to isolate individual flowers, an entire branch or an entire plant, you should give the plant a gentle shake every couple of days to help distribute the pollen, which is also something that many indoor chilli growers do.
Another method used by commercial growers to isolate peppers and prevent cross-pollination is to plant individual crops up to a mile apart. However, on this page we're only looking at methods which are practical for the average home grower. Unless you're a commercial grower then isolating plants by distance isn't really an option.
How to Save Chilli Pepper Seeds
When peppers you've selected for seed saving appear to have reached full maturity I recommend you leave them on the plant for at least a further 7–10 days before removing them. This will ensure that the seeds have reached full maturity before you cut the fruit open and de-seed it. Even when the fruit of a given variety appears to have reached full maturity it may not always necessarily be the case. It won't harm to leave the fruit on the plant for longer, even to the point where it starts to turn soft. Sometimes,
brown coloured varieties may look fully mature, but after removing them from the plant you may notice that it wasn't necessarily the case. Personally, I always leave peppers I've selected for seed saving on the plant for several weeks after they've ripened, to the point where they start to wrinkle and turn soft. Obviously, you should only save seeds from your healthiest-looking pepper plants. Never save seeds from plants which show signs of disease because said diseases can also spread to the seeds, resulting in the next generation of plants being diseased too.
When de-seeding chilli peppers it's always advisable to wear gloves to prevent the capsaicin from getting on your fingers. It's also advisable to wear protective safety glasses to prevent any juice from squirting up into your eyes. You can purchase both relatively cheaply from hardware stores. Obviously, if you're only de-seeding sweet peppers then there's no need to bother wearing gloves or protective safety glasses. De-seeding peppers is not rocket science. The main objective is to cut them open, remove the seeds and then place them somewhere to dry before packaging and storing them.
Some growers remove the placenta from the fruit with the seeds still intact and then dry the whole thing before removing the seeds. Other growers prefer to store the fruit in a warm place to dry before removing the seeds. Obviously, this can only really be done with thin-walled varieties. Thicker-walled varieties, such as
Bell Peppers and
Rocoto Peppers, are not very easy to dry and may turn mouldy in the process. Most growers just de-seed ripe fruit and place the seeds somewhere warm to dry, and this is the method I've outlined below.
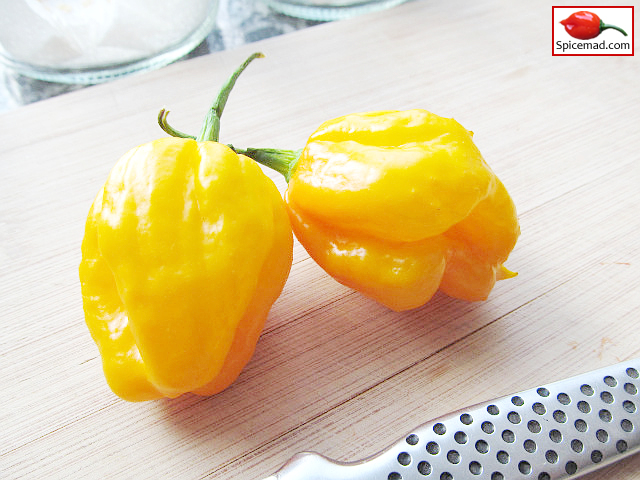 |
Chillies for De-seeding
|
Using a sharp knife, make an incision at the apex (tip) of the pepper and then slice up to the calyx on both sides. Obviously, when doing this with small-fruited varieties, such as
Cappuccino Chiltepin, you need to be very careful not to cut your fingers open. You could just slice the whole pepper in half along its axis, but I recommend doing it this way to reduce the possibility of slicing into some of the seeds.
 |
Saving Chilli Pepper Seeds - Step 1
|
Open the pepper with your fingers and then inspect both halves carefully. If you see any signs of mould you should discard the whole thing and then start again with a new one. Even the smallest amount of mould inside the pepper could have potentially infected the seeds.
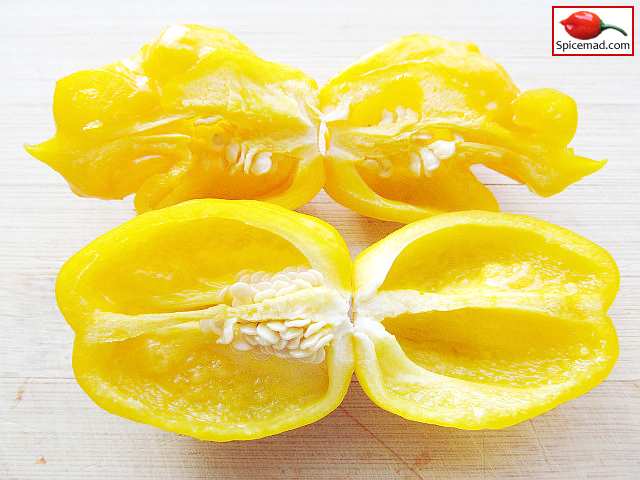 |
| Saving Chilli Pepper Seeds - Step 2 |
Carefully cut the placenta away from the inside of the fruit and then scrape the seeds off onto a dinner plate or a chopping board. This is easy enough to do when working with larger-fruited varieties, but can be very tedious when working with smaller-fruited varieties, such as
Aji Charapita and
Dwarf Chiltepin. If any seeds still have pieces of flesh attached to them you should try and remove as much of it as possible. Sometimes, you will find that the seeds come away from the placenta very easily, and other times not so much.
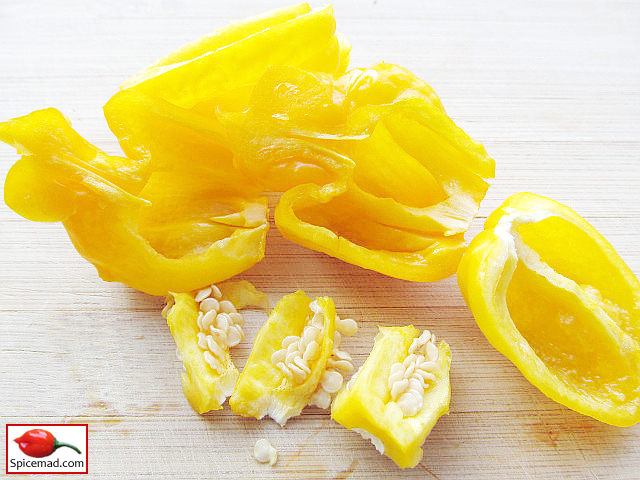 |
| Saving Chilli Pepper Seeds - Step 3 |
Inspect the seeds carefully. If some of them look abnormally small or thin or have black blemishes on them then just discard those ones. In my experience, a black blemish on seeds tends to be more of an issue with
superhot varieties. Although they may still be perfectly viable, given the amount of healthy seeds you'll be saving, it's really not worth crying over a few odd-looking ones.
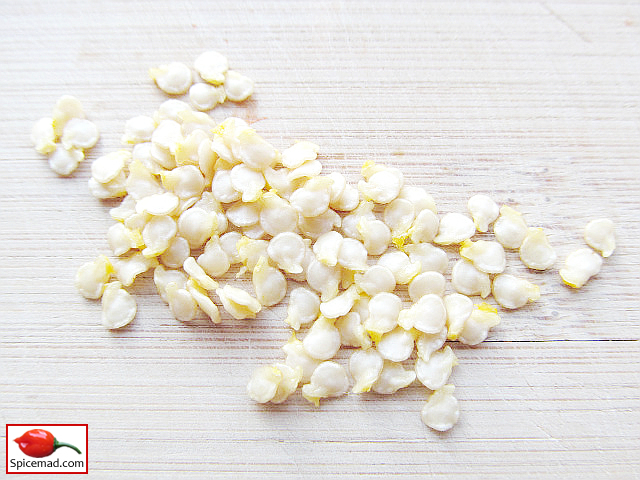 |
Saving Chilli Pepper Seeds - Step 4
|
The next thing you'll need to do is place the seeds somewhere to dry. I dry mine on absorbent kitchen paper in a warm dark place. I've always done it this way and never had any problems. I place my seeds into glass ramekins or small wide neck jars which I label and line with absorbent kitchen paper beforehand. I then place them onto a shelf in the bedroom and just forget about them for several weeks. If you're planning to de-seed more than one variety then it's very important that you label whatever containers you're going to be using beforehand to ensure that none of the
varieties get mixed up. When de-seeding more than one variety you should always wipe your knife, chopping board and all other utensils in between de-seeding each one. This helps to ensure than no stray seeds from the previously de-seeded variety accidentally end up in the batch of another variety, which can happen very easily.
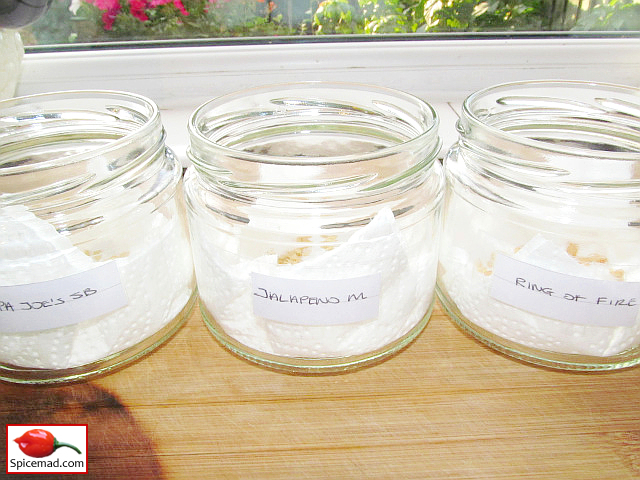 |
Saving Chilli Pepper Seeds - Step 5
|
There's no set time for how long seeds will need to be left for until they're fully dried. As mentioned above, I just place mine onto a shelf and forget about them for several weeks. If you make the effort to isolate flowers or entire plants so that you can save true to type seeds then also make the effort to place the seeds inside a container lined with absorbent kitchen paper when drying them. Don't just place them onto a piece of kitchen paper or newspaper paper on a windowsill. If you do this there's a good chance they could get mixed up or end up on the floor.
The importance of making sure that pepper seeds are fully dried prior to being bagged and stored away can never be overstated! All it takes is a small amount of moisture to turn an entire batch mouldy. Although you may have had the seeds sitting around on a shelf for several weeks it does not necessarily mean they are completely dry. A good way to ensure they are fully dried before being bagged is to place the jars or ramekins into a heated propagator for 72 hours. Just imagine your shock when you open a bag of your favourite pepper seeds that you saved from the previous season, only to find that the entire batch is mouldy.
Some people recommend washing pepper seeds under cold running water before drying them. I don't recommend doing this. Having tried it in the past, I noticed that the viability of the washed seeds was non-existent after two years. I was able to successfully germinate some of them six months after saving them, but after two years all of them were inviable. However, seeds of the same varieties which were over five years old and hadn't been washed still had good germination rates. In my opinion, it's better to just remove the seeds from the peppers and then place them somewhere to dry. The less we interfere with them the better. Washing chilli pepper seeds under cold running water will also make people cough and sneeze, especially if you're working with the hotter varieties, such as
Fatalii and
Caribbean Red Habanero.
You may have also heard about something called the float test or floating seed test. This is an old gardening myth claiming that if you place seeds into a jar of water the good seeds or viable seeds will sink to the bottom and the bad or non-viable seeds will float to the top where they can be scooped off and discarded. There is no truth to this and it is just a myth. You'll find with any batch of seeds that some will sink and some will float, and the buoyancy of seeds in water is not a reliable indicator of their viability.
How to Package and Store Chilli Pepper Seeds
Once your pepper seeds are dried you'll then need to package them and store them away. Some chilli growers use small paper envelopes to store their seeds in and others, such as myself, prefer to use small grip seal bags. It really doesn't matter which one you use, providing the seeds are fully dried before being bagged. You should never store seeds in plastic bags if they're not fully dried because they will eventually turn mouldy. The advantage to using grip seal bags is that you can reseal the bags after opening them, which is something you can't do with envelopes.
Obviously, it's very important to write the variety name and the year in which the seeds were saved onto the envelope or plastic bag. Alternatively, if you're using grip seal bags you can write the information onto a small piece of paper and then place the piece of paper into the bag with the seeds, which is what I do. Doing this will also allow you to reuse the grip seal bags. I always double-bag my pepper seeds and there are two reasons for this. The first reason is to ensure that if any of the bags were to break then I'm not going to have random seeds scattered in the bottom of my seed box. The second reason is because sometimes I may have more than one bag of seeds for a given variety, and by double-bagging them I can store all bags of seeds of a given variety together.
 |
Saving Chilli Pepper Seeds - Step 6
|
Seeds need to be stored correctly to ensure they remain viable. The best place to store them is in a cool dark place. Ideally, after packaging your seeds you should store the packets inside a seed box. Airtight plastic clip lock containers make ideal seed boxes and can be purchased relatively cheaply from most good supermarkets. If you have a few small packs of silica gel lying around then you can place those inside your seed box too. Due to its hygroscopic nature, silica gel will pull out any moisture that may be present inside your seed box.
 |
Saving Chilli Pepper Seeds - Step 7
|
Some growers store their seeds in the refrigerator and believe that it has the added benefit of emulating a seasonal transition that seeds are sometimes exposed to in nature. It's believed that pepper seeds which have been exposed to a cold spell will germinate faster than those which have not. However, the main reason for storing pepper seeds in the refrigerator is to prolong their lifespan. If you plan on storing pepper seeds in the refrigerator then it's ultra important that you make sure they are fully dried, packaged very well and that there is no excess moisture in your seed box. Never store pepper seeds in the freezer because it will damage the embryo inside the seed. Although some of the world's genebanks store seeds in flood, bomb and radiation-proof vaults at sub-zero temperatures, such a practice is way beyond the scope of the average chilli grower! Then again, given how we love chillies so much it's something worthy of consideration! 😂
Providing you store your pepper seeds in a cool dark place there really is no need to store them in the refrigerator. However, if you wish you can still place seeds that you're planning to sow in the refrigerator for several days prior to sowing. Doing so might help to wake them up a bit. One has to wonder how much benefit there really is to exposing chilli pepper seeds to the cold when you consider that most chilli plants come from warm parts of the world.
Capsicum pubescens,
Capsicum baccatum and some wild species, such as
Capsicum eximium, come from the Andean region of South America and seeds of these plants may or may not benefit from a cold spell prior to sowing. The temperatures in Peru and Bolivia, where the three aforementioned species come from, can sometimes drop to below freezing at night during the wintertime.
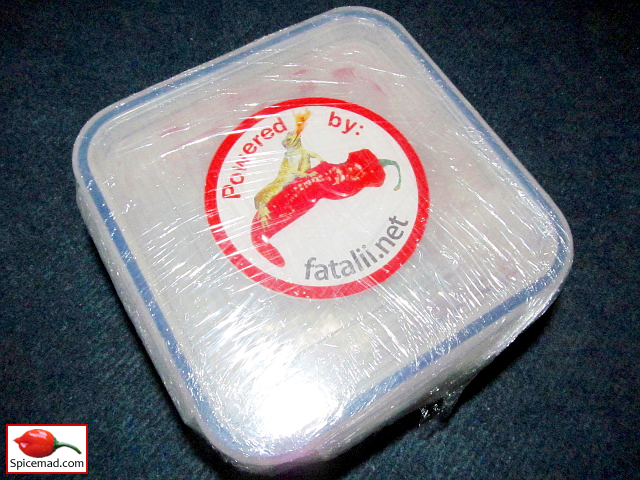 |
| Saving Chilli Pepper Seeds - Step 8 |
It's also recommended to keep a logbook or a spreadsheet containing the name of each variety, along with where the seeds came from and the year in which you purchased, acquired or saved them in. Personally, I use a spreadsheet for this purpose. It lists the name of each variety I have, along with the species, seed quantity, fruit colour, country of origin, year(s) in which they were purchased, acquired or saved and a section where I can add additional notes about any given variety. At the bottom of the spreadsheet I have a section which lists the number of varieties I have per species, the total number of seeds in my seed box (yes, I count all seeds before adding them to my collection), maximum and minimum values of the entire collection and a section showing the date in which the spreadsheet was last updated. I always update the spreadsheet after adding or removing seeds from my collection, and by doing so I always know what's in my seed box without having to unnecessarily open it.
Whether it be a
Jalapeño,
Bell Pepper,
Habanero or
Rocoto, by following the above steps you can ensure that your sweet pepper and chilli pepper seeds will remain true to type and viable for several years. When stored correctly, pepper seeds can remain viable for many years. I once germinated some
Orange Habanero seeds that were over 10 years old! Some sources claim that pepper seeds can remain viable for up to 20 years when stored under proper conditions. However, under the storage conditions used by the average chilli grower it's best to aim for a turnover rate of about three to four years. I normally keep pepper seeds for about three years and then save new ones.
Always share seeds with other growers whenever possible, especially if they're seeds for rare varieties, because doing so will ensure that they become more common.


